Saturday, April 13, 2013

How to create gridview dynamically in jsp

| 0 comments
How to generate gridview dynamically on runtime.We all waste lot of time ,to manage data in Grid view (Table Form ) Each Time when there is another Database table,we have to create a new Grid view for that.We can utilize this time while creating a single Grid view control that automatically generate Grid view.That Control accept Collection and bean object from us and generate the corresponding Grid View.This can be done by using reflection,Now there is no need to typecast the collection(ArrayList) and iterate it.While using reflection we can retrive the fields of any object. there is example
       for (Field field : bean.getClass().getDeclaredFields())
           {
             field.setAccessible(true); //set it to make Accessiable
             System.out.println( field.getName());
           }
Here bean is object and field object save the Fields retrive form bean object This code print the field name of your bean object(In Control this fieldname became the heading of grid view).Now how to retrive the value from the collection Object
       for (Field field : collection.getClass().getDeclaredFields())
            {
                field.setAccessible(true);
                Object value;
                value = field.get(collection);// Retrive the vale from the Collection object
                System.out.println(value);
            }
field.get(Object) return the value in field From this code we retrive the value's of collection.Now you got the basic idea how control works.I already created Grid view Control,You just have only to use it Download Code  .Here is Smaple view for the output of control
Pass the Collection and bean object,name of servlet .when you click on Select or Delete the form is submitted and control goes to servlet (which you specify).And you have to chosse one unique field accordingly which perform Select or Delete operation .Suppose I want to select or delete field  according to Id (As specified in Image),then I set index in my code to 0 and if I want to do operation according to Name then I set index to 1 and so on ,Start it from 0.Here is Code for Passing bean object,Collection Object ,Servlet Name and Index.
<%
       SignupDA sa = new SignupDA();
       Signups da = sa.Getall();//collection object
       Signup be = new Signup();//bean object
       int ind = 0; // It is index
       application.setAttribute("bean", be);
       application.setAttribute("coll", da);
       application.setAttribute("action", "ManageCategory"); servlet name 
       application.setAttribute("index", ind);
    %>
    <%@ include file="/Control/Gridview.jsp"%>
Collection is nothing new ,it is same as Arraylist<bean> you can use ArrayList<yourbean> instead of Singups,sa is object of DBoperation,be is object of bean class,ind is index,ManageCategory is Servlet.Now how to use the Control on your jsp page.Grid view control is also a jsp page.For this we have to include the Gridview.jsp file on current Jsp which is specifed in previous Code.This way you can use Gridview Control in your project 
If you click on Link select or delete it will go to the servlet, you can recieve the value in doPost section as shown below 
    protected void doPost(HttpServletRequest request,
            HttpServletResponse response) throws ServletException, IOException
        {
          String Id = request.getParameter("index");
          String Operation = request.getParameter("operation");
          System.out.println(Id + " " + Operation);
        }
Here you recieve the index and operation.if you want to delete then you can use"if(Operation.equals("Delete")) {your code}" by using Id (Index value)For Select "if (Operation.equals("Select")) {your code}"

Here is code for Gridview Control  Download Code 
If you have any confusion .Please Drop your Comment Below

Thursday, April 4, 2013

Where does Eclipse store generated servlet files after jsp run on server?

| 7 comments
I wonder many time that where the compiled jsp goes.I can't find it in the Eclipse workspace not in tomcat server directory.I read it in the book ,it say that  the compiled servlet save in the work directory,but I still can't find it.After some effort's fortunately, I find the storage location in the environment variables of Project. but it is tricky way.
 Now in good manner how to find the storage location of your tomcat server
  •  Double Click on the server

  • Now as arrow point to the location ,Catch this location in your Eclipse Workspace  
  • This folder contain the Tomcat Server Container and other important stuff
  • Conf is same as Same as Servers folder in your eclipse workspace 
  • work folder contain the servlet file of jsp. "work\Catalina\localhost\YourProjectName\org\apache\jsp"
  • jsp folder contain the java file and class file .Open Java file in the eclipse,this is compiled form of your jsp file

Tuesday, April 2, 2013

Send Email through Java via Gmail,Yahoo,Hotmail or your hosting Email server

| 18 comments
How to send email from java? .For this we need an JavaMail API .Include this jar file in your class path by placing it into YourProject\WebContent\WEB-INF\lib or if you are not using EE version then add it into environment variable.
        
     First we need to login to mail account.
  • Email server consist two types of port, one is for incoming mail(POP, IMAP) and another is for outgoing mail(SMTP).For sending purpose we only need SMTP port of that particular Email server.
  • Second thing is how to send authentication data to server using insecure network.To maintain security there is two protocol SSL and TLS which send authentication data(Email,Password) to server in encrypted form,If we use TLS ,it allow both secure and unsecure connection,and if SSL it only allow secure Connection.That is up to user to choose the protocol
  • In java to carry Email account setting,we use Properties,These Email settings are 
            1. smtp host
            2. smtp port (either for protocol SSL or for protocol TLS)
            3  valid EmailId and password of active account
     Now Code for Login in Gmail using SSL protocol
        Properties props = new Properties();
        props.put("mail.smtp.host", "smtp.gmail.com"); / /      Host Name
        props.put("mail.smtp.socketFactory.port", "465");/ /       SSL Port     
        props.put("mail.smtp.socketFactory.class","javax.net.ssl.SSLSocketFactory");
        props.put("mail.smtp.auth", "true");
        props.put("mail.smtp.port", "465");
        Session session = Session.getDefaultInstance(props, new javax.mail.Authenticator()
            { protected PasswordAuthentication getPasswordAuthentication()
                {  return new PasswordAuthentication("YOUREMAIL@GMAIL.COM", "PASSWORD");
                 }
             });
     
 Now Code for Login in Gmail using TLS protocol
       Actually Gmail use STARTTLS

        Properties props = new Properties();
        props.put("mail.smtp.auth", "true");
        props.put("mail.smtp.starttls.enable", "true");
        props.put("mail.smtp.host", "smtp.gmail.com");/ /       Host Name
        props.put("mail.smtp.port", "587"); / /    TLS Port
        Session session = Session.getDefaultInstance(props, new javax.mail.Authenticator()
            { protected PasswordAuthentication getPasswordAuthentication()
                {  return new PasswordAuthentication("YOUREMAIL@GMAIL.COM", "PASSWORD");
                 }
             });
  • Now after login we have to compose email,First understand our email message cannot simply transfer through http,for this a particular standard are set and those are mime standard,our email server use mime to transfer email ,first it convert the email message into mime format and transfer it on network Know more about Mime
  • Email Header contain all the information about the message and Routing information.
  • Use MimeMessage to create mail format. It provide option to set From ,where and To whom ,email is going to be sent and it also provide setSubject to set the Subject of Email.
  •  After that,it give freedom to setContext of email.Use text/html if you want to send html in message else there is no need to setContext to text/html
  • At Last Transport.send(message),same as we click on send button in email client application
      Message message = new MimeMessage(session);
      message.setFrom(new InternetAddress("YOUREMAIL@GMAIL.COM"));
      message.setRecipients(Message.RecipientType.TO,InternetAddress.parse(TO@XYZ.COM));
      message.setSubject("My First Email using Behind Java Scene");
      String msg="Thank's to Behind Java Scene to teach the core aspect of Email sending "
      message.setContent(msg, "text/html; charset=utf-8");
      Transport.send(message);
  
   Email Server Settings for Yahoo
     Only change the host Name and SMTP port from Login code 
     Host Name :smtp.mail.yahoo.com
     SMTP port: 465 
        Properties props = new Properties();
        props.put("mail.smtp.socketFactory.port", "465");  
        props.put("mail.smtp.socketFactory.class","javax.net.ssl.SSLSocketFactory");
        props.put("mail.smtp.host", "smtp.mail.yahoo.com");
        props.put("mail.smtp.auth", true);  
   Email Server Settings for Hotmail 
     Only change the host Name and SMTP port from Login code in SSL section 
     Host Name: smtp.live.com 
     SMTP port: 25  
 Same for Hosting Server only change your particular Host Name and change your specific SMTP port

Sunday, March 31, 2013

How to import web application from one system to another system

| 0 comments
How to import  web application from one system to another without any error.One method is to just copy the project from one Workspace to another ,but some time it's not successfully deploy and Tomcat(Catalina Container) will not synch with that project.Best way to deploy the web application from one system to another is, creating a WAR file(Web application ARchive) from web application ,Same as jar file in java Project.
Steps to Create War File
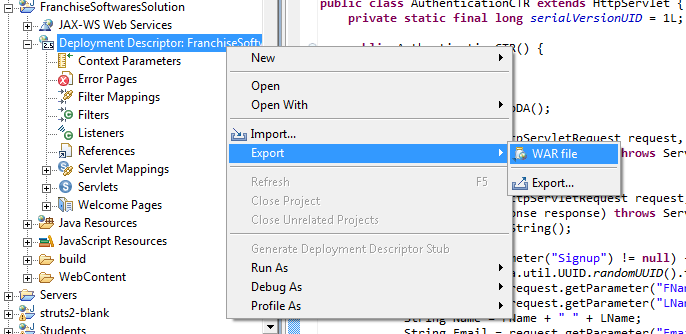
  • Open Web Application Right click on Deployment Descriptor-->Export->War file


  •  Set the path where to save and name given to war file,here,I change the war filename because if i give same name then it conflict with existing Project,But you can put the same name if you are deploying it on another system.
  •  Click on Finish 
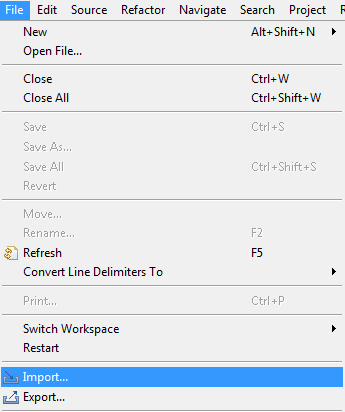
  • Now how to deploy War file on another system.Click on File-->Import 
                            

  • Select Web-->War Next.                                                                                                           
              
  •  Browse the War file where it is saved and click on Finsh
          
  • Now it successfully import the Web Application without any Error

Friday, March 29, 2013

Several Port(8080, 8009) Error how to remove without restarting eclipse

| 1 comments
We all got this error many time but we just simply restart the eclipse to avoid.Now why this error occur


  1. Because there is already one tomcat server is running and we try to run another tomcat server.It seem Previous tomcat is out of synch or not stopped.
  2. What happen when we restart the eclipse ,it destroy the running tomcat from memory 

 Is it possible to handle this error without restarting eclipse ???
  1. Yes
  2. How?
  3. delete the running tomcat from memory.
  4. what i have to do for this?
  5. open  task manager in Process bar find the process called javaw.exe and just end this process,this delete the running tomcat from memory
  6. Now go back run your application ,It's working fine now.

Friday, March 15, 2013

Behind the scene of First Program

| 5 comments
Running a java program give the output on console.but to analysis the detail of java program ,need to debug using Breakpoint,on which line we  have to pause the execution of running java program,just simply Toggle Breakpoint on that line .Right Click on corresponding line as show below

   Here Toggle Breakpoint on Main function and then click on debug  button as shown below
  
   Chosse yes for Debug perspective
               
Overview of Debug perspective .It Contain the debug Section where current thread on execution is shown
and variable section show the stack of current java program (local variable).Debug current Instruction pointer indicate that upto which line processing has been done and on which line it point has to be done

press f6 button to go on next line and it will show the output on console section .f6 is used to step over.

abstraction is naked in next post ,this post just give idea that how to run the debug perspective.

Tuesday, March 12, 2013

Setup System to run java programs

| 0 comments
To run a java program we first need a jdk install on our machine,So download Jdk and Eclipse Juno from  http://www.eclipse.org/downloads/packages/release/indigo/sr2


Chosse your downloading option according to operating system.If your operating system is 32-bit the choose operating system 32 Bit else choose operating system 64 Bit.After Download just Extract the eclipse-jee-indigo-SR2-winXX-XX_.XX.zip.No need of installation


Click on the eclipse.exe 
After that it required the workspace where all the project will be save .Give path to the WorkSpace

 Click on Java Project


Next->Give Project name

 Click Finish and make it default perspective

Right Click on src >new>class


Give Class Name ,Check the method Stub to public staic void main(String[] args) and Finish

Create the first basic Program  and click on arrowed button to run the program

Output display in Console.Now you successfully create your first program.In next post discussion on the what happen when we run the Program behind the scene.